
If you want to know how to create a WordPress staging website, you’ve come to the right place! If you’re scratching your head and unsure as to what that even is, don’t sweat it. It’s essentially a replica of your live website that you can use to test out new plugins, themes, and other updates before pushing them to your live site. This is a great way to ensure that any changes you make don’t break your live site, and it also gives you a chance to preview what your updates will look like before making them public.
In this tutorial, we’ll go through the process of creating a staging website step by step. We’ll start by discussing the tools and resources you’ll need, and then we’ll move on to the actual process of setting up the staging site. By the end of this tutorial, you’ll have a fully functional staging website that you can use to test out updates and make sure everything is working as it should before going live.
Before we dive in though, let’s pause briefly to discuss some of the benefits creating a staging site can offer to WordPress users.
Benefits of Using a Staging Site
In addition to the ability to test out updates and changes before they go live, there are several other benefits to using a staging site:
- Improved site performance: By testing out updates and changes on a staging site first, you can identify and fix any potential performance issues before they affect your live site. This can help to improve overall site speed and efficiency.
- Reduced downtime: When you make updates or changes directly to your live website, there is a risk of causing downtime or other issues. By testing these changes on a staging site first, you can minimize the risk of downtime considerably.
- Greater control over updates: Using a staging site allows you to have greater control over the updates and changes you make to your website. You can take your time to test out the changes and ensure everything works as intended.
- Better collaboration: If you have a team working on your website, a staging site can be a great tool for collaboration. Multiple team members can work on it at the same time, and then you can push the changes to the live site once everything has been finalized.
- Easier rollbacks: If something goes wrong after you’ve pushed changes to your live site, it can be difficult to undo the changes. With a staging site, you can easily roll back to a previous version if something goes wrong.
Overall, using a staging site can help to improve the performance, stability, and control of your website, and it can also make the process of updating and maintaining your site much easier and more efficient.
Now, let’s get down to the tutorial!
Step 1: Gather Your Tools and Resources
Before we start setting up the staging website, you’ll need to make sure you have all the tools and resources you need. Here’s a list of what you’ll need:
- A WordPress website: This should be pretty obvious, but you’ll need to have a WordPress website already set up and running in order to create a staging website. If you don’t already have a WordPress website, you’ll need to set one up before proceeding.
- A hosting provider: In order to create a staging website, you’ll need to have a hosting provider that supports staging websites. Some hosting providers offer staging websites as a built-in feature, while others may require you to install a plugin or use a separate service.
- A staging plugin: If your hosting provider doesn’t offer staging websites as a built-in feature, you’ll need to use a plugin to create the staging website. There are a number of staging plugins available for WordPress, but we’ll be using the popular WP Staging plugin in this tutorial.
- A domain name: You’ll need to have a domain name for your staging website, even if you already have one for your live website. You can use a subdomain (e.g. staging.yourdomain.com) or a separate domain entirely (e.g. staging-yourdomain.com).
- FTP access: In order to set up the staging website, you’ll need FTP access to your hosting account. This will allow you to upload the staging plugin and make any necessary changes to your website’s files.
Step 2: Install the WP Staging Plugin
You’ve gathered all the tools and resources that you need, now it’s time to begin establishing your staging website. The initial move is to install the WP Staging plugin on your live website. To perform this, sign in to WordPress and click on Plugins on the left-hand side of the screen.
To begin, click Add New and search for “WP Staging” in the plugin repository. Once located, press Install Now.
After the successful installation of your plugin, be sure to hit Activate. The plugin should then be ready to use. Easy as that!
Step 3: Set Up the Staging Website
Now that you’ve downloaded and enabled the WP Staging plugin on your primary website, it’s time to create a staging environment. To begin this process, head over to the WP Staging menu in your WordPress dashboard.
By taking just a few minutes of your valuable time, you can quickly configure and deploy an exact replica of your live site for testing purposes!
On the Create New Staging Site page, you’ll see a form where you can enter the details for your staging website. You can begin by giving it a name.
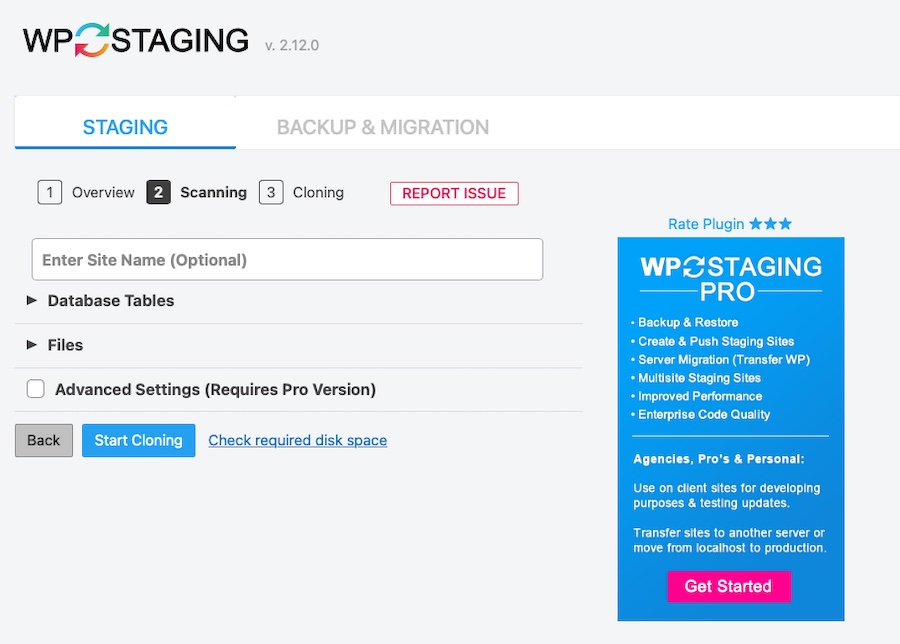
After you have determined which databases and files you’d like included, it’s time to get started. Simply click Start Cloning to create a full copy of your website. Then, WP Staging will start generating your staging site; this process may take some time based on how large your current one is.
Once done, you’ll be greeted with a message of success. Feel free to click on the Open Staging Site link at this time.
From here you’ll be asked to log in using your WordPress site’s admin credentials.
Step 4: Test Your Staging Website
Now that your staging website is built, testing it should be the next step. Log in and navigate through the pages to ensure everything runs smoothly before putting into full use. Doing this will provide you with a peace of mind knowing all features are functioning as intended.
With a staging site, you can make all the changes to your website without affecting its performance. Test out any modifications or updates on it first and see how they look like before going live – this way, you’ll be able to catch bugs in time and prevent them from appearing in the final version of your web page.
Step 5: Push Changes to Live Website
Once you have finished testing your updates on the staging website, it’s time to launch the changes onto your live website! To do this, head back to the WP Staging menu in your WordPress dashboard and select Staging Sites from its submenu. You will need the Pro version of this plugin to push updates from your staging site to your production (or live) site. Otherwise, you can manually replicate the changes made on the staging site on your live site. This can be useful if you’re just looking to test a few updates on occasion.
If you need to make huge changes and want to push them directly from the staging site to live, however, the Pro version is required. With the Pro version installed, you’ll see a list of all the staging websites you’ve created on the Staging Sites page. Click on the name of the staging website that you want to push changes from, and then click on the Push to Live button.
Get ready to be impressed – the WP Staging plugin will initiate transferring the modifications from your staging website to its live counterpart. This process may take a few minutes, depending on how big your website is and how many revisions you’ve done.
Upon deploying the changes to your live website, a confirmation message will appear – letting you know that everything has been accepted. Now it’s time for you to experience the outcome of all your hard work: simply check out your site and observe how much better it looks!
Creating a WordPress Staging Website is a Timesaver in the Long Run
And that’s it! You now know how to create a WordPress staging website using the WP Staging plugin. This is a great tool to have in your toolkit if you’re making frequent updates to your website, as it allows you to test out changes before they go live and avoid any potential issues.
Good luck!